The problem: You want Maven to stop making all those network calls when you issue it commands like clean, build, test, package etc. You might want to work on a project while you have no network connection.
The solution: You can use the off line mode for Maven to keep it from making any network calls. You can do so by issuing the -o flag to the mvn command. When using this mode Maven will need to have all the jars it needs in your local repository (~/.m2/repository by default). To make this easier you can use a trick provided by the dependency plugin. Imagine we just checked out a project. Now we want to work on this project off line. To get all the dependencies needed by the project you can issue the command "mvn dependency:go-offline". This will download the dependencies you need. Now note it will not make sure you have all the plugins you need. Say you want to run "mvn -o site:run", creating a site for your project and making it available via Jetty. You will need to have used this plugin before so that it is in your local repo. The same goes for compile, package, test and the like.
The million dollar question is why use off line mode? Well it could be that it makes quicker the process you are doing with Maven, since Maven will not try to call out to any network repos. I've timed the difference between using it and not using it for some fairly large projects and found it doesn't make a huge difference. For really big projects (I cannot really name one) it might shed enough seconds to make it worth using often, maybe even creating an alias. This 'huge' project mind you would probably have upwards of 200 jar (dependencies) or more being managed. Another reason one might use off line is as follows: you have a local network repository used by the developers at work. One day the person you administers this repository is going to move it somewhere new. This going to take a few hours. Using off line mode you could weather this time if prepared without noticing too much that the repository is down. This could also be helpful in situations where you are going to not be able to reach the repository, like working at home with no network connection, or the server hosting the repo crashed.
Thursday, December 20, 2007
Sunday, December 16, 2007
Using Maven for Bash Script Projects
I recently created a Maven project unlike any I have ever created. This project contained no Java sources! No it was not a Groovy project ;) It was a project that contained only bash scripts. Read up for the why and the how.
I created a set of bash scripts that allow invoking SOAP services, returning the XML response. The SOAP services provide information on email distribution lists, such as which addresses are on a list and which lists a user's email address is subscribed to. These scripts are likely to change and grow over time so I made sure to put them into Subversion. Not too shabby. But what about distributing the scripts? What about managing versions of the scripts? I have become accustomed to having the aforementioned handled in my projects via Maven. Maven makes such things simple to set up and automate. I determined I could move these bash scripts into a Maven project to cultivate these benefits.
Now the how. For packaging I use the Maven assembly plugin. It allows created automated creation of zip tar.gz and gzip archives. These archives work great work distributing a project. I started my work by creating a skeleton Maven project. I put the scripts and related files into the src/main/scripts folder of the project. Next I created a xml file used by the assembly plugin to direct how files will be structured in the created compressed archive or archives. Here my file:
I'll write up a more thorough article on using the assembly plugin later. For now suffice to say this file will instruct Maven to create a zip archive containing the files listed above. The last thing we want to do is configure the assembly plugin in the project's POM file. I used the following XML in my projects pom:
In the above config I also bind the assembly goal to the package phase. This means when I execute "mvn package" the assembly plugin will fire off and create the zip archive. Nice! Otherwise you can also use "mvn assembly:assembly" should do the job. Now so that I could use the scm and release plugins to check in changes to SVN and create tagged releases of the project I added the following to the POM:
Now to release the current version of the project I can type "mvn release:prepare". This will tag the current version in SVN, then update the POM to the new version number and check those changes into the SVN trunk. This saves me the hassle and reduces the chances of user error in this boring, repetitive process. In the vein of the SCM configuration you could now use other plugins such as the JIRA reporting plugin, site plugin etc. to bolster this simple bash script project.
I created a set of bash scripts that allow invoking SOAP services, returning the XML response. The SOAP services provide information on email distribution lists, such as which addresses are on a list and which lists a user's email address is subscribed to. These scripts are likely to change and grow over time so I made sure to put them into Subversion. Not too shabby. But what about distributing the scripts? What about managing versions of the scripts? I have become accustomed to having the aforementioned handled in my projects via Maven. Maven makes such things simple to set up and automate. I determined I could move these bash scripts into a Maven project to cultivate these benefits.
Now the how. For packaging I use the Maven assembly plugin. It allows created automated creation of zip tar.gz and gzip archives. These archives work great work distributing a project. I started my work by creating a skeleton Maven project. I put the scripts and related files into the src/main/scripts folder of the project. Next I created a xml file used by the assembly plugin to direct how files will be structured in the created compressed archive or archives. Here my file:
<?xml version="1.0"?>
<assembly>
    <id>zimbrascripts</id>
    <formats>
        <format>zip</format>
    </formats>
    <includeBaseDirectory>false</includeBaseDirectory>
    <dependencySets>
        <dependencySet>
            <outputDirectory>hacksdb/lib</outputDirectory>
        </dependencySet>
    </dependencySets>
    <fileSets>
        <fileSet>
            <directory>src/main/scriptapp/bin</directory>
            <outputDirectory>zimbrascripts/bin</outputDirectory>
            <fileMode>0755</fileMode>
            <directoryMode>0755</directoryMode>
        </fileSet>
        <fileSet>
            <directory>src/main/scriptapp/etc</directory>
            <outputDirectory>zimbrascripts/etc</outputDirectory>
            <fileMode>0644</fileMode>
            <directoryMode>0755</directoryMode>
        </fileSet>
        <fileSet>
            <directory>src/main/scriptapp/tokens</directory>
            <outputDirectory>zimbrascripts/tokens</outputDirectory>
            <fileMode>0600</fileMode>
            <directoryMode>0777</directoryMode>
        </fileSet>
        <fileSet>
            <directory>src/main/scriptapp/xml</directory>
            <outputDirectory>zimbrascripts/xml</outputDirectory>
            <fileMode>0644</fileMode>
            <directoryMode>0755</directoryMode>
        </fileSet>
    </fileSets>
    <files>
        <file>
            <source>src/main/scriptapp/README.txt</source>
            <outputDirectory>zimbrascripts</outputDirectory>
        </file>
    </files>
</assembly>
I'll write up a more thorough article on using the assembly plugin later. For now suffice to say this file will instruct Maven to create a zip archive containing the files listed above. The last thing we want to do is configure the assembly plugin in the project's POM file. I used the following XML in my projects pom:
<build>
  <plugins>
    <plugin>
      <artifactId>maven-assembly-plugin</artifactId>
      <configuration>
        <descriptors>
          <descriptor>src/main/assembly/assembly.xml</descriptor>
        </descriptors>
      </configuration>
      <executions>
        <execution>
          <id>make</id>
          <phase>package</phase>
          <goals>
            <goal>assembly</goal>
          </goals>
        </execution>
      </executions>
    </plugin>
  </plugins>
</build>
In the above config I also bind the assembly goal to the package phase. This means when I execute "mvn package" the assembly plugin will fire off and create the zip archive. Nice! Otherwise you can also use "mvn assembly:assembly" should do the job. Now so that I could use the scm and release plugins to check in changes to SVN and create tagged releases of the project I added the following to the POM:
<scm>
  <connection>scm:svn:https://svn.com/DistributionLists/DistListScriptsMaven/trunk/</connection>
  <developerConnection>scm:svn:https://svn.com/DistributionLists/DistListScriptsMaven/trunk/</developerConnection>
  <url>https://svn.com/DistributionLists/DistListScriptsMaven/</url>
</scm>
Now to release the current version of the project I can type "mvn release:prepare". This will tag the current version in SVN, then update the POM to the new version number and check those changes into the SVN trunk. This saves me the hassle and reduces the chances of user error in this boring, repetitive process. In the vein of the SCM configuration you could now use other plugins such as the JIRA reporting plugin, site plugin etc. to bolster this simple bash script project.
Saturday, December 1, 2007
Big Project Troubleshooting Pt. 1: Transitive Dependencies
Maven is complex, but so is Ant or Make once a project passes a certain size. With Maven many things are done in a standard way, so that when a project becomes large you still should be able to work with it easily. With Ant or Make a large project will likely have many arbitrarily named targets which you will have to study and learn. With Maven all those named targets are pretty much standardized by the plugins which provide all functionality. Large projects in Maven commonly have the same sorts of issues. These can be pretty nasty to for the uninitiated. So to help you out I'm going to write a series of articles tackling the problems faced in big Maven projects. In this article I'm going to give you some information on issues related to dependencies.
The dependency mechanism is the main reason many people become interested in Maven. It sure makes life easy... but everything cannot always be automated. Sometimes you will need to give Maven some help. It will try to correctly resolve the dependencies needed by your project by creating a graph. More on this in a second.
Maven has what is called a 'transitive dependency'. Let me explain transitive dependencies for those who don't know. A dependency of a project is defined via a project's pom.xml. Every dependency has a pom.xml (in the repository with the dependency) which is used by Maven to find the dependencies relied upon by a dependency. These 'relied upon' dependencies are also known as transitive dependencies. They are included into your projects class path automatically. Now you can have any number of levels of transitive dependencies because Maven also will get the each transitive dependency's dependencies. In Maven this forms what is called the dependency graph. Yes this is the same graph I spoke of earlier. It looks like a tree, with your project as the root node, tree level one as the dependencies of your project and subsequent levels being transitive dependencies.
Now lets talk about the sticky points. If there are two or more versions of the same dependency in the graph of the dependencies for your project then Maven will need to make a choice as to which one to use. By default Maven will use the version that is the closest to the top node of the tree. If this version is older than the other version(s) you may have a problem. Likely a NoClassDef where a class from the new dependency cannot be found, because it does not exist in the older version. When you get this error it should be obvious which dependency the error is being caused by. The stack trace should give the full package path to the class. We can use this to figure out how to fix the problem.
At this time you probably could open a terminal session and cd to your local repository location (~/.m2/repository by default) and then cd into the dependency's folder in the repository. This can be helpful since it will allow you to see which versions of the dependency are being used and which classes are in each dependency. You could execute a "jar -tf {jarname} | grep {ClassName}" command on each jar to search it for the given class.
Let us discuss troubleshooting. First you will want to run the mvn dependency:resolve command. This will print out a listing of the resolved dependencies for your project. Resolved dependencies are those calculated by Maven via the dependency graph to be used in the project. You should be able to see which version of the troubled dependency is being used. I had you cd to the dependencies repo location. Check now which versions you have in your repository. You should be able to use the "jar -tf" command to check if the class causing the NoClassDef exists in one of the newer version jars (if you have newer version jars). Once you have found a jar that contains the class make note of the version.
Now for some debugging. This is where you get waist deep in it. We are going to use the -X option to Maven, which enables debugging. We also want to run just the compile phase which will give us all the info we need on the dependency graph. You might want to do something like "mvn -X compiler:compile > junk.txt" just so that you can use a text editor like Vi to search about the file. Now when you view this output you will be able to find a listing of the absolute classpath, including with jars are being used. You also will get a printout of the dependency graph including info on what ended up making it in. It is pretty easy to find the version of a dependency being used: find the one with the least amount of indent. If one or more versions share the least amount of indent then the newest version will be selected.
To get around version problems you can do a number of things. The easiest thing to do is define the newer version of the dependency directly in the pom.xml of the project. This will make sure that the newer version is used because it is 1) at the top of the dependency tree 2) the version is highest. You can also use excludes for a dependency definition in the pom.xml file for the old version of the dependency. Since the old version is excluded the newer (yet further down the graph) version will be used. When using excludes you will need to figure out which dependency in the pom.xml file has the transitive dependency to be excluded. Neither of these fixes are tough to perform, and will become easy to do in time.
The dependency mechanism is the main reason many people become interested in Maven. It sure makes life easy... but everything cannot always be automated. Sometimes you will need to give Maven some help. It will try to correctly resolve the dependencies needed by your project by creating a graph. More on this in a second.
Maven has what is called a 'transitive dependency'. Let me explain transitive dependencies for those who don't know. A dependency of a project is defined via a project's pom.xml. Every dependency has a pom.xml (in the repository with the dependency) which is used by Maven to find the dependencies relied upon by a dependency. These 'relied upon' dependencies are also known as transitive dependencies. They are included into your projects class path automatically. Now you can have any number of levels of transitive dependencies because Maven also will get the each transitive dependency's dependencies. In Maven this forms what is called the dependency graph. Yes this is the same graph I spoke of earlier. It looks like a tree, with your project as the root node, tree level one as the dependencies of your project and subsequent levels being transitive dependencies.
Now lets talk about the sticky points. If there are two or more versions of the same dependency in the graph of the dependencies for your project then Maven will need to make a choice as to which one to use. By default Maven will use the version that is the closest to the top node of the tree. If this version is older than the other version(s) you may have a problem. Likely a NoClassDef where a class from the new dependency cannot be found, because it does not exist in the older version. When you get this error it should be obvious which dependency the error is being caused by. The stack trace should give the full package path to the class. We can use this to figure out how to fix the problem.
At this time you probably could open a terminal session and cd to your local repository location (~/.m2/repository by default) and then cd into the dependency's folder in the repository. This can be helpful since it will allow you to see which versions of the dependency are being used and which classes are in each dependency. You could execute a "jar -tf {jarname} | grep {ClassName}" command on each jar to search it for the given class.
Let us discuss troubleshooting. First you will want to run the mvn dependency:resolve command. This will print out a listing of the resolved dependencies for your project. Resolved dependencies are those calculated by Maven via the dependency graph to be used in the project. You should be able to see which version of the troubled dependency is being used. I had you cd to the dependencies repo location. Check now which versions you have in your repository. You should be able to use the "jar -tf
Now for some debugging. This is where you get waist deep in it. We are going to use the -X option to Maven, which enables debugging. We also want to run just the compile phase which will give us all the info we need on the dependency graph. You might want to do something like "mvn -X compiler:compile > junk.txt" just so that you can use a text editor like Vi to search about the file. Now when you view this output you will be able to find a listing of the absolute classpath, including with jars are being used. You also will get a printout of the dependency graph including info on what ended up making it in. It is pretty easy to find the version of a dependency being used: find the one with the least amount of indent. If one or more versions share the least amount of indent then the newest version will be selected.
To get around version problems you can do a number of things. The easiest thing to do is define the newer version of the dependency directly in the pom.xml of the project. This will make sure that the newer version is used because it is 1) at the top of the dependency tree 2) the version is highest. You can also use excludes for a dependency definition in the pom.xml file for the old version of the dependency. Since the old version is excluded the newer (yet further down the graph) version will be used. When using excludes you will need to figure out which dependency in the pom.xml file has the transitive dependency to be excluded. Neither of these fixes are tough to perform, and will become easy to do in time.
Thursday, October 4, 2007
Maven Theory: Archetypes
Maven is a complex system to swallow in its entirety. Most persons first encounter it because they want to wield the dependency magic it offers. These persons are not savvy to the notion of repositories and with them the administrative work required to build and manage them. They are not likely to understand that Maven can build complex websites, containing useful reports on project health, with little configuration and user effort. These are things that Maven accomplishes in a very elegant manor (in my opinion). You see Maven 2 was built almost from scratch, using the knowledge gained in the creation of the original Maven. Hence a sound architecture was built in Maven 2 that has proven adaptable to many tasks.
In this post I want to talk more about one of the extension points of Maven 2. Archetypes. These are a lot like templates. When invoked an archetype will either create a new project, or add to an existing one. Archetypes can be created by an end user and deployed into a repository. This allows others to access the archetype and reuse it. A little while back I was doing a fair bit of SOAP service programming. I was using XFire in the creation of these projects, along with other Java technologies. After the first couple projects I decided creating an archetype for XFire projects would be handy. So I created an archetype project that could generate a bare bones Maven 2 project. This project would contain a pom with all the needed dependencies, and a simple "Hello World" SOAP service and an integration test. Now whenever I wanted to create a new XFire project I would just invoke this archetype; giving me a good head start! Now I would like to point out that, if you are like me, you would normally just find the 'similar' project then copy and paste. Then you trim down the copy or whatever. That is a viable alternative, although I feel one is better off with a nearly clean canvas when striking out on a project.
So now that I have talked your ear off, let me give an example of using a real archetype to generate a full project. The base Maven has an archetype for creating Maven projects. Seems reasonable eh? So to create your next computational masterpiece start with the command:
I will write up some better examples on archetypes down the road. I would like to give an example of creating a simple archetype. Keep tuned in for more, and do not hesitate to leave a comment or contact with ideas.
In this post I want to talk more about one of the extension points of Maven 2. Archetypes. These are a lot like templates. When invoked an archetype will either create a new project, or add to an existing one. Archetypes can be created by an end user and deployed into a repository. This allows others to access the archetype and reuse it. A little while back I was doing a fair bit of SOAP service programming. I was using XFire in the creation of these projects, along with other Java technologies. After the first couple projects I decided creating an archetype for XFire projects would be handy. So I created an archetype project that could generate a bare bones Maven 2 project. This project would contain a pom with all the needed dependencies, and a simple "Hello World" SOAP service and an integration test. Now whenever I wanted to create a new XFire project I would just invoke this archetype; giving me a good head start! Now I would like to point out that, if you are like me, you would normally just find the 'similar' project then copy and paste. Then you trim down the copy or whatever. That is a viable alternative, although I feel one is better off with a nearly clean canvas when striking out on a project.
So now that I have talked your ear off, let me give an example of using a real archetype to generate a full project. The base Maven has an archetype for creating Maven projects. Seems reasonable eh? So to create your next computational masterpiece start with the command:
mvn archetype:create -DgroupId=com.someguy -DartifactId=masterpieceAnd tadah you now have a folder called 'masterpiece' which contains a very basic Maven 2 project. There are other archetypes you can run with out any special setup, including an archetype to create archtypes! Now I'm not advocating creating an archetype as a precursor to any new project. Create one whenever you start to notice a pattern between projects. A good candidate for me was Spring, Hibernate and other dependencies I used very often in web projects. I created a simple archetype to create a bare bones web MVC application using these dependencies. With this I could start creating the controllers and .jsp pages in my application right away, rather than mucking around copying some old ant project :)
I will write up some better examples on archetypes down the road. I would like to give an example of creating a simple archetype. Keep tuned in for more, and do not hesitate to leave a comment or contact with ideas.
Monday, September 3, 2007
Bootstrap When Using Pom Inheritance
The problem:
Parent pom files can allow you to standardize many projects. Project maintenance tasks such as updating shared attributes like repository locations is easy. You can also define things like how tests are run, reports to generate and more.
When using a parent pom it must be accessible from one of your defined Maven repositories, but... often times the parent pom contains your repository definitions. When you clean your local repository (removing the parent pom locally) you will no longer have defined repository locations. You will therefore not be able to download the parent pom (if installed in a network accessible repository), and not be able to build projects that inherit from this pom.
The solution:
It is common to have a company/organization repository that will contain any parent poms used in inheritance of projects. When you need to get one of these parent poms you will need access to this repository. That means you will need to define the repository. There are a number of ways to do this: put a definition in your projects pom (cold), put a definition in your settings.xml (getting warmer). Neither of these are that great.
Putting the repository information into the project makes for crappy upkeep. Think, if you have 10 projects with poms that contain repository definitions, and the repositories move, you need to update all those files with the new information. Therefore do not put (unless you are using Maven small scale...).
Don't just put the repository definition into the settings.xml file either. If you do this every time you run Maven this repository will be searched for artifacts. It is much cleaner to define the repository in a profile, in your settings.xml file.
Why use a profile? Profiles allow you to enable certain features when needed. In our case we want to activate the parent pom repository definition. So first you need some xml in your pom like so:
This piece of gold will let Maven search the given repository when needed. To activate this you would put the string "-Pbootstrap" in with the Maven command you are executing. How about an example?
Parent pom files can allow you to standardize many projects. Project maintenance tasks such as updating shared attributes like repository locations is easy. You can also define things like how tests are run, reports to generate and more.
When using a parent pom it must be accessible from one of your defined Maven repositories, but... often times the parent pom contains your repository definitions. When you clean your local repository (removing the parent pom locally) you will no longer have defined repository locations. You will therefore not be able to download the parent pom (if installed in a network accessible repository), and not be able to build projects that inherit from this pom.
The solution:
It is common to have a company/organization repository that will contain any parent poms used in inheritance of projects. When you need to get one of these parent poms you will need access to this repository. That means you will need to define the repository. There are a number of ways to do this: put a definition in your projects pom (cold), put a definition in your settings.xml (getting warmer). Neither of these are that great.
Putting the repository information into the project makes for crappy upkeep. Think, if you have 10 projects with poms that contain repository definitions, and the repositories move, you need to update all those files with the new information. Therefore do not put (unless you are using Maven small scale...).
Don't just put the repository definition into the settings.xml file either. If you do this every time you run Maven this repository will be searched for artifacts. It is much cleaner to define the repository in a profile, in your settings.xml file.
Why use a profile? Profiles allow you to enable certain features when needed. In our case we want to activate the parent pom repository definition. So first you need some xml in your pom like so:
<profiles>
   <profile>
       <id>bootstrap</id>
       <repositories>
           <repository>
               <id>parent</id>
               <name>Maven repository -- bootstrap</name>
               <url>http://abc.com/mvn2</url>
           </repository>
       </repositories>
   </profile>
</profiles>
This piece of gold will let Maven search the given repository when needed. To activate this you would put the string "-Pbootstrap" in with the Maven command you are executing. How about an example?
mvn -Pbootstrap clean packageOnce you have run this command once the parent pom should be downloaded locally, so you will not need to run activate the bootstrap profile very often.
Monday, July 2, 2007
Setting Command Line Arguments for JVM in Maven
The problem:
You want to set JVM args for the Maven application (such heap memory).
The solution:
On a Linux/Unix machine the "mvn" command will use a shell variable "MAVEN_OPTS" to pass in options. This is useful if you want to give Maven more memory. In your .profile or .bash_profile put a line like this in:
You want to set JVM args for the Maven application (such heap memory).
The solution:
On a Linux/Unix machine the "mvn" command will use a shell variable "MAVEN_OPTS" to pass in options. This is useful if you want to give Maven more memory. In your .profile or .bash_profile put a line like this in:
export MAVEN_OPTS=-Xmx1024mNow every time you run "mvn" you will have up to 1024 megs of heap space! Use this to set other JVM arguments.
SCM control
The problem:
You would like to integrate your source control management directly into a Maven 2 project.
The solution:
Source control is needed to maintain the health of any mid to large size project. Maven knows this! Maven has very broad source control management support. Have you heard of Mercurial? Well you can integrate Mercurial SCM support right into a Maven 2 project. Or Subversion, CVS, Perforce, etc. To get started is easy, you will need to configure an "scm" section in your projects pom.xml file. I will give an example:
Once you have configured your scm section other plug ins (such as release) will be able to leverage it's information. You should see the documentation on SCM configuration to get up and running with your SCM implementation.
You would like to integrate your source control management directly into a Maven 2 project.
The solution:
Source control is needed to maintain the health of any mid to large size project. Maven knows this! Maven has very broad source control management support. Have you heard of Mercurial? Well you can integrate Mercurial SCM support right into a Maven 2 project. Or Subversion, CVS, Perforce, etc. To get started is easy, you will need to configure an "scm" section in your projects pom.xml file. I will give an example:
<scm>
  <connection>scm:svn:https://svn.oreilly.com/RobUtils/trunk</connection>
  <developerConnection>scm:svn:https://svn.oreilly.com/RobUtils/trunk</developerConnection>
  <url>https://svn.oreilly.com/RobUtils</url>
</scm>
Once you have configured your scm section other plug ins (such as release) will be able to leverage it's information. You should see the documentation on SCM configuration to get up and running with your SCM implementation.
Run a specific test
The problem:
You have a group of unit tests that you run through the Maven Surefire plugin. You do not want Surefire to run all the tests, rather you want only one specific test to run.
The solution:
This one is easy, all you need to do is put a little something into your command to tell the Surefire plugin "run just this one test". What does this look like? Here is an example: "mvn -Dtest=FunTest package". Here you want to package your applicaiton, but you are going to run the FunTest first. Notice you don't put a ".java" or ".class" extension onto the name. Thats it, you can use the "-Dtest=..." to run a single test anytime that the Surefire plugin will be run.
Import Maven Project into Eclipse w/ Style (Maven + Eclipse pt. 3)
The problem:
You have a Maven 2 project, and would like to work on it in Eclipse. Oh, and you want the Maven plug in for Eclipse configured on this project too!
The solution:
The first thing I do when I check out a Maven project is generate the Eclipse project files. Start by going to the project's root folder and typing:
This will create the files Eclipse uses to understand the project, .project and .classpath. There are links to the jars configured via the pom in the .classpath file. You will want to get rid of these, because the Maven plug in will handle dependency configuration. Go into the .classpath file and delete all "classpathentry" nodes that have "M2_REPO" in the path attribute value. Now save this file.
At this point your project should have errors. Eclipse cannot find the jars needed to build properly. Worry not. Now we will enable the Maven plug in. Right click on the project root node in the package explorer to bring up the menu. Select "Maven" and then "enable". After a bit of processing your project should rebuild. Now you have the benefits of the Maven plug in!
You have a Maven 2 project, and would like to work on it in Eclipse. Oh, and you want the Maven plug in for Eclipse configured on this project too!
The solution:
The first thing I do when I check out a Maven project is generate the Eclipse project files. Start by going to the project's root folder and typing:
mvn eclipse:eclipse
This will create the files Eclipse uses to understand the project, .project and .classpath. There are links to the jars configured via the pom in the .classpath file. You will want to get rid of these, because the Maven plug in will handle dependency configuration. Go into the .classpath file and delete all "classpathentry" nodes that have "M2_REPO" in the path attribute value. Now save this file.
At this point your project should have errors. Eclipse cannot find the jars needed to build properly. Worry not. Now we will enable the Maven plug in. Right click on the project root node in the package explorer to bring up the menu. Select "Maven" and then "enable". After a bit of processing your project should rebuild. Now you have the benefits of the Maven plug in!
Eclipse Plugin for Maven 2 Development (Maven + Eclipse pt. 2)
The problem:
You use the Maven 2 system for your projects. You use Eclipse to write your Java code, and things like running and debugging applications.
The solution:
Get the Maven 2 plug in for Eclipse! This is a very nice plugin. This plug in will handle configuring your projects class path. It will add the dependencies defined in your pom to the class path. It will also add and remove dependencies from the class path as you add or remove them in the pom file. It comes with a nice little wizard allowing searching of dependencies, with the ability to add them into your pom with a simple click. This wizard can also be configured to search on the dependencies installed in your local repository.
You can find the plugin here. If you like using the Eclipse plugin manager use this url: http://m2eclipse.codehaus.org/update/
Once you have installed the plug in you can create "Maven 2" projects that are configured in the Maven standard format (you know "src/main/java", "src/test/java" folders etc.). You can also right click a project select the "Maven2" option and select "enable". This will configure your project's class path using the project's pom. Note that this means your project must have a pom! Now Eclipse will have access to all classes contained within the jars managed by Maven.
This is great, but wait there is more. You of course will want to run Maven commands from within Eclipse, because having to go back and forth between the IDE and command line is just too much work. Worry not, just go to the "Run" menu, select "External Tools" and select the "External Tools..." menu item. This will bring up a menu where you should see a category called "m2 build". By clicking on this category you can create new launchers for doing Maven commands. One word of caution I've found some, more complex, Maven commands did not work great this way. The one in particular was the "jetty:run" command.
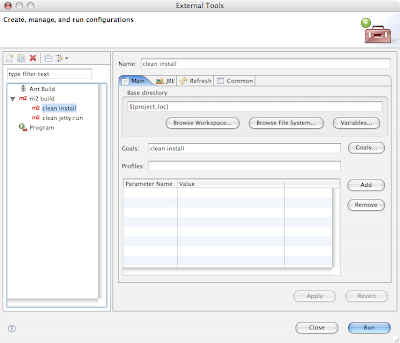 Click this image to see a bigger version
Clean project
The problem:
Your project creates a collection of output like classes, jars, websites and more. You want to delete this output!
The solution:
Ok this is kinda a joke. Simply type "mvn clean" and your project's output is gone. How does this work? Well Maven works like a 70 year old man on an all bran diet, very regular. Java source files go into "src/main/java" while testing sources go in "src/test/java". In the same vein plug ins such as site, generate their output into a folder called "target".
Any Maven project will share this convention, since you know when looking at a Maven project folder that "src" contains sources, resources and such, and "target" contains output created from the sources. So think about it this way: sources (in "src" folder) are transformed via Maven plug ins into output (in "target" folder).
I will mention that these conventions can be overridden, but.... that is not a good idea and you should never do so.
Generate Website and View It Locally
The problem:
You are using Maven to create documentation on your project. You want to use the site plug in to generate this documentation into a website. What you need is a quick way to proof your changes, seeing how they look on the website.
The solution:
This one blew me away. When you are working on your documentation you can easily view changes, just run this command:
If a project is configured with the Javadoc report there are some nice uses here. you can pop up a site while working on a project and view the Javadoc. This is a useful technique when first checking out a project, so that you may better familiarize yourself with it.
You are using Maven to create documentation on your project. You want to use the site plug in to generate this documentation into a website. What you need is a quick way to proof your changes, seeing how they look on the website.
The solution:
This one blew me away. When you are working on your documentation you can easily view changes, just run this command:
mvn site:runThis will get a Jetty web server going with your web site running on it. Now just go to localhost:8080 to see your site. This technique is really helpful when configuring reports, as you can quickly test them out.
If a project is configured with the Javadoc report there are some nice uses here. you can pop up a site while working on a project and view the Javadoc. This is a useful technique when first checking out a project, so that you may better familiarize yourself with it.
Generate website
The problem:
Keeping your project documented can interfere with the ten other roles you must fill. I'm speaking from a perspective of the small software shop were you cannot afford to have one or more paid documentation experts (or QA or project management for that matter :)
The solution:
Maven can be a god send to a small software shop. I feel Maven often gives people the notion it is for use in big software shops. Not true. Just because large Apache Java projects are using it does not mean it is too much for a small library or application type project. Maven can create for you a full website, including reports on things such as test coverage, JavaDoc, PMD information, dependencies, email lists, etc. etc. This sounds pretty complex, eh? Well worry not it is simple, and I will show you how to generate such wonders... but in later posts. Let's KISS here. So you have a Maven project and you want a site generated, so just type the following and you will have a full site in the target folder of your project:
mvn siteDone!
Release Plugin "Dry Run"
The problem:
Running the "release:prepare" command in Maven does a number of caustic things. It will check in and tag your code in the SCM you use. It will also change the projects pom, rolling the version number up. If you have any "SNAPSHOT" dependencies it will fail.
The solution:
Maybe you want to do a "dry run" before executing a command that could muck up your SCM and pom? By "dry run" I mean the release plug in goes through the motions, but nothing is changed in the SCM, and your pom doesn't get messed up. Here is what you do:
mvn release:prepare -DdryRunThe "-DdryRun" tells the plug in to not fully perform the preparation. You will find this generates some temporary files in the project folder. These include:
- pom.xml.next : what the projects pom looks like after the release
- pom.xml.releaseBackup : what the pom looked like before
- pom.xml.tag : the pom for the tagged version of project
- release.properties : the information about the release of the project
mvn release:cleanI recommend you use this whenever you are getting ready to release. It will save you a lot of time, because just one botched release attempt could take minutes to clean up. The dry run will take seconds to run.
Release plugin
The problem:
Your project uses some sort of Source Control Management (SCM). Being that your project is using Maven there are considerations such as project version to take into account when tagging releases of your project. You want a simple way to "release" a version of your project. Normally you would edit the POM changing to a new release version (from snapshot), then tag the release in your SCM, then change the pom version to the newest version, and finally check in the new pom. Another consideration is the dependencies you are using, you do not want to have snapshot dependencies in your "released" project.
The solution:
Maven developers quickly experienced the difficulty of rolling a version of a project. Thats why we now have the release plug in. When you are ready to do a release simply issue the command:
. This section is used by the release plugin to know how to interact with your SCM.
Once you issue the command above you will be asked to give a tag name and the new version for the pom. You can also just hit enter to have the plug in use default values. Thats it, check your pom and you will see the new version. Check the source control and you will see the tag.
Your project uses some sort of Source Control Management (SCM). Being that your project is using Maven there are considerations such as project version to take into account when tagging releases of your project. You want a simple way to "release" a version of your project. Normally you would edit the POM changing to a new release version (from snapshot), then tag the release in your SCM, then change the pom version to the newest version, and finally check in the new pom. Another consideration is the dependencies you are using, you do not want to have snapshot dependencies in your "released" project.
The solution:
Maven developers quickly experienced the difficulty of rolling a version of a project. Thats why we now have the release plug in. When you are ready to do a release simply issue the command:
mvn release:prepareThis plug in makes short work to releasing a version of your project. You must have configured the SCM section of the pom
Once you issue the command above you will be asked to give a tag name and the new version for the pom. You can also just hit enter to have the plug in use default values. Thats it, check your pom and you will see the new version. Check the source control and you will see the tag.
Wednesday, June 27, 2007
Artifactory Can Help you Manage a Repository
I was browsing TSS and found this article. It's a good read for any seasoned Maven 2 developer, talking about repository theory and a piece of software called Artifactory. I like that Artifactory combines caching of external artifacts with a nice Web-UI where you can manage your repository. The article does a great job of explaining why and when to use Artifactory.
Artifactory looks like a real helpful piece of software. I'll stick to my dead simple repository setup for now, but I am going to give it a try real soon. The caching alone makes it worth using, as I have found in the past it speeds up Maven's execution time.
Artifactory looks like a real helpful piece of software. I'll stick to my dead simple repository setup for now, but I am going to give it a try real soon. The caching alone makes it worth using, as I have found in the past it speeds up Maven's execution time.
Monday, June 25, 2007
Profiles + Dependency Management
The problem:
You want to be able to easily switch between versions of dependencies in your project. This could be in the range of only one project dependency up to every dependency in you project.
The solution:
You can create profiles that each define a dependency management section. In each of these dependency management sections you can set the versions for dependencies in your project. Then you will invoke a profile to set the dependency (or dependencies) version(s) used in building, testing, releasing etc.
Now why would you want to do this? Well there are a set of situations where you need your project to be able to build and release in lieu of differing version requirements. You may be building a framework that should work with Spring 1.x and Spring 2.x, or maybe Servlet spec 2.4 and 1.x. Let's look at such an example to demonstrate this technique:
In the above example you can see that you could specify the "newspring" profile to use Spring version 2.1, or the profile "oldspring" to use 1.2. You can apply other profile techniques such as default profiles here. Where can you define configuration such as the above? Well normally you would put it directly into your pom.xml. Doing so allows you you to leverage the parent child relationship! You can create profiles which contain different dependency versions in dependency management sections, and inherit them by many child projects. This allows child projects to easily specify which versions of certain technologies are used (I need to create a lengthy example of this in action!).
FYI, you likely will not use this technique in a simple Maven project, rather it will be used with some other advanced techniques.
You want to be able to easily switch between versions of dependencies in your project. This could be in the range of only one project dependency up to every dependency in you project.
The solution:
You can create profiles that each define a dependency management section. In each of these dependency management sections you can set the versions for dependencies in your project. Then you will invoke a profile to set the dependency (or dependencies) version(s) used in building, testing, releasing etc.
Now why would you want to do this? Well there are a set of situations where you need your project to be able to build and release in lieu of differing version requirements. You may be building a framework that should work with Spring 1.x and Spring 2.x, or maybe Servlet spec 2.4 and 1.x. Let's look at such an example to demonstrate this technique:
<profiles>
<profile>
 <id>newspring</id>
 <dependencyManagement>
    <dependencies>
     <dependency>
      <groupdId>org.springframework</groupId>
      <artifactId>spring</artifactId>
      <version>2.1</version>
     </dependency>
    <dependencies>
 </dependencyManagement>
</profile>
<profile>
 <id>oldspring</id>
 <dependencyManagement>
    <dependencies>
     <dependency>
      <groupdId>org.springframework</groupId>
      <artifactId>spring</artifactId>
      <version>1.2.1</version>
     </dependency>
    <dependencies>
 </dependencyManagement>
</profile>
</profiles>
In the above example you can see that you could specify the "newspring" profile to use Spring version 2.1, or the profile "oldspring" to use 1.2. You can apply other profile techniques such as default profiles here. Where can you define configuration such as the above? Well normally you would put it directly into your pom.xml. Doing so allows you you to leverage the parent child relationship! You can create profiles which contain different dependency versions in dependency management sections, and inherit them by many child projects. This allows child projects to easily specify which versions of certain technologies are used (I need to create a lengthy example of this in action!).
FYI, you likely will not use this technique in a simple Maven project, rather it will be used with some other advanced techniques.
Dependency Management, WTF?
The problem:
You want to standardize versions of a set of dependencies used in a group of project.
The solution:
A set of projects may use a given dependency. I know that I often use both Hibernate 3.x and Spring 2.x in my projects. It can make a lot of sense to use the same versions of dependencies across multiple projects. This may be especially important when you have a set of projects that are very closely related, maybe with dependencies to one another. Enter the dependency management function of the Maven pom. I put WTF in the title because thats what I thought when I discovered this feature for myself. It really is a well thought addition to the Maven platform.
So how do you do this? First you will want to put a dependency management section in a pom. Likely this is a parent pom which is inherited by many projects, otherwise what is the point? I MEAN DEPENDENCY MANAGEMENT IS MEANT FOR MANAGING DEPENDENCIES ACROSS MANY POMS. Sorry that was the main point you should take away from this session.
Here is what the dependency management section will look like:
So that will set the version of the shown spring artifact to 2.1. Now how will this make a difference? You will not include a version when adding this dependency in a project which has this dependency management section. You will simply add this dependency config:
It is pretty simple, Eh? Also note that when you want to upgrade to a new version of a dependency it is as simple as changing the version in the parent pom's dependency management section. Hows that for simple management of your dependencies?
You want to standardize versions of a set of dependencies used in a group of project.
The solution:
A set of projects may use a given dependency. I know that I often use both Hibernate 3.x and Spring 2.x in my projects. It can make a lot of sense to use the same versions of dependencies across multiple projects. This may be especially important when you have a set of projects that are very closely related, maybe with dependencies to one another. Enter the dependency management function of the Maven pom. I put WTF in the title because thats what I thought when I discovered this feature for myself. It really is a well thought addition to the Maven platform.
So how do you do this? First you will want to put a dependency management section in a pom. Likely this is a parent pom which is inherited by many projects, otherwise what is the point? I MEAN DEPENDENCY MANAGEMENT IS MEANT FOR MANAGING DEPENDENCIES ACROSS MANY POMS. Sorry that was the main point you should take away from this session.
Here is what the dependency management section will look like:
<dependencyManagement>
   <dependencies>
       <dependency>
           <groupdId>org.springframework</groupId>
           <artifactId>spring</artifactId>
           <version>2.1</version>
       </dependency>
   <dependencies>
</dependencyManagement>
So that will set the version of the shown spring artifact to 2.1. Now how will this make a difference? You will not include a version when adding this dependency in a project which has this dependency management section. You will simply add this dependency config:
<dependency>
    <groupdId>org.springframework</groupId>
    <artifactId>spring</artifactId>
</dependency>
It is pretty simple, Eh? Also note that when you want to upgrade to a new version of a dependency it is as simple as changing the version in the parent pom's dependency management section. Hows that for simple management of your dependencies?
Maven Plugin for Generating Eclipse projects (Maven + Eclipse Pt. 1)
The problem:
You want to use the ubiquitous IDE, Eclipse, with your Maven project.
The solution:
Just because you use Maven doesn't mean that you are going to jump through hoops to make it work with Eclipse; all you need to do is type "mvn eclipse:eclipse". This command will generate the .classpath and .project files that Eclipse needs so that it can understand your project.
Once you run this command in your project boot up Eclipse and click File -> import -> General -> Existing projects into workspace -> next, now use the enabled browse button to find the project's root directory. Once you do this click OK. You should see your project in the projects window. Make sure it is selected and press the "Finish" button.
Right now you probably see all sorts of errors. LOL. One last thing. You must create an Eclipse classpath variable that points to your local Maven repository. Click the following: "Window -> Preferences... -> Java -> Build Path -> Classpath Variables". You now shall click "new" button and create a variable with name "M2_REPO" and value being where your local Maven repo is found. Usually this is ${HOME_DIR}/.m2/repository. On my OS X machine this is "/Users/ottaway/.m2/repository". On my Windows machine it is "C:\Documents and Settings\rob\.m2\repository". Once you set this press the "OK" button.
Your projects dependencies should now be loaded. Note that if you add new dependencies to your project you will need to run the "mvn eclipse:eclipse" command again. This will regenerate the .classpath file that contains the dependencies.
Exclude Transitive Dependencies
The problem:
You have a dependency in your project, that brings with it other dependencies. Some of these you do not want added to your project.
The solution:
First off if you don't know, transitive dependencies are those which are depended on by dependencies in your project. If you have dependency A in your pom, and it depends on dependencies B and C, then B and C are referred to as transitive dependencies. If B relies on D then it will also be referred to as a transitive dependency. In this scenario dependencies A, B, C and D are added to your project.
What if you load a newer version of B? Now you have two versions of B in your project. This may cause you pain. Well worry not. You can easily exclude dependency B from your project. Just use this example, but plug in your dependency details and those of the transitive dependency to exclude:
There you go, thats all there is to it! Note that you likely will not have to do this all too often, but it's good to know what to do when you experience this problem.
You have a dependency in your project, that brings with it other dependencies. Some of these you do not want added to your project.
The solution:
First off if you don't know, transitive dependencies are those which are depended on by dependencies in your project. If you have dependency A in your pom, and it depends on dependencies B and C, then B and C are referred to as transitive dependencies. If B relies on D then it will also be referred to as a transitive dependency. In this scenario dependencies A, B, C and D are added to your project.
What if you load a newer version of B? Now you have two versions of B in your project. This may cause you pain. Well worry not. You can easily exclude dependency B from your project. Just use this example, but plug in your dependency details and those of the transitive dependency to exclude:
<dependency>
  <groupId>group-a</groupId>
  <artifactId>A</artifactId>
  <version>2.0</version>
  <exclusions>
      <exclusion>
          <groupId>group-b</groupId>
          <artifactId>B</artifactId>
      </exclusion>
  </exclusions>
</dependency>
There you go, thats all there is to it! Note that you likely will not have to do this all too often, but it's good to know what to do when you experience this problem.
Friday, June 15, 2007
Install Maven On Your Machine
The problem:
You need Maven installed on your machine:
The solution:
Go to maven.apache.org and you will find the download you want. I recommend you get the newest 2.x release of Maven. Download Maven. Once complete unzip it onto your filesystem.
You now will want to create a MVN_HOME system variable to point to your installation (where you unzipped Maven). In Linux/BSD you will probably be adding this variable in your .bash_profile or .profile file in your home directory. Example:
export MVN_HOME=/usr/local/maven2.6
PATH=$PATH:$MVN_HOME/bin
On Windows you can add these vars through the control panel -> system -> advanced (tab) -> Environment variables (button). This is where you enter system variables for Windows. You probably only want to use Maven for your account, so create a new var in the top window. Name it MVN_HOME and set it's value to the location of Maven. Next, if you don't have a Path var in the user variables create one, set it's value to %MVN_HOME%/bin. (Windows tip, press windows-key + pause to bring up the system props).
Adding the Maven bin to your system path allows you to invoke via the command line anywhere . When you are done with the previous type 'mvn' and you should get an error saying you must specify a goal. This means you are ready to go!
Do Not Test!!!
The problem:
You would like to skip unit testing when using Maven.
The solution:
You can very easily tell Surefire, the plugin in Maven that handles testing, to not run tests. All you need to do is specify the system property 'maven.test.skip. Here is an example:
The above command will clean and package your project and will do so without running your tests. This is a very useful command in Maven. It comes in especially handy when trying to build someone else's project that contains non-portable test that run by default. These may keep you from building their project. Use this command to build the project and maybe install or deploy it.
You would like to skip unit testing when using Maven.
The solution:
You can very easily tell Surefire, the plugin in Maven that handles testing, to not run tests. All you need to do is specify the system property 'maven.test.skip. Here is an example:
mvn -Dmaven.test.skip clean package
The above command will clean and package your project and will do so without running your tests. This is a very useful command in Maven. It comes in especially handy when trying to build someone else's project that contains non-portable test that run by default. These may keep you from building their project. Use this command to build the project and maybe install or deploy it.
Thursday, June 14, 2007
Using Snapshots for Rapid Development
The problem:
You are working on a project with a number of other related sub-projects. You would like to release snapshots of your project's artifact (maybe a war or jar) for use in these other projects. This will help those other projects move along while your project is being developed.
The solution:
You can configure your project to produce a snapshot artifact, just add '-SNAPSHOT' to the end of your project's version number in it's pom. Now when you package the project you will get a artifact labeled with SNAPSHOT. You now can take advantage of releasing the snapshot for other projects to use. You should configure a 'snapshotRepository' section in your 'distributionManagement' section of your pom. Here is an example of how this works:
With the above pom you could type 'mvn deploy' and a unique jar will get deployed. You can check this by checking /test_snapshot_repo/test_snaps/test_snaps/0.0.1-SNAPSHOT/. Run the 'mvn deploy' command a few times and you will see a bunch of these begin to build up.
You are working on a project with a number of other related sub-projects. You would like to release snapshots of your project's artifact (maybe a war or jar) for use in these other projects. This will help those other projects move along while your project is being developed.
The solution:
You can configure your project to produce a snapshot artifact, just add '-SNAPSHOT' to the end of your project's version number in it's pom. Now when you package the project you will get a artifact labeled with SNAPSHOT. You now can take advantage of releasing the snapshot for other projects to use. You should configure a 'snapshotRepository' section in your 'distributionManagement' section of your pom. Here is an example of how this works:
<?xml version="1.0" encoding="UTF-8"?>
<project>
<modelVersion>4.0.0</modelVersion>
<groupId>test_snaps</groupId>
<artifactId>test_snaps</artifactId>
<packaging>jar</packaging>
<version>0.0.1-SNAPSHOT</version>

<distributionManagement>
 <snapshotRepository>
  <id>test_snapshot_repo</id>
  <uniqueVersion>true</uniqueVersion>
  <name>test_snapshot_repo</name>
  <url>file:/test_snapshot_repo</url>
 </snapshotRepository>
</distributionManagement>

</project>
With the above pom you could type 'mvn deploy' and a unique jar will get deployed. You can check this by checking /test_snapshot_repo/test_snaps/test_snaps/0.0.1-SNAPSHOT/. Run the 'mvn deploy' command a few times and you will see a bunch of these begin to build up.
Specifying your Project's Artifact
The problem:
You want to specify what the output of your Maven project will be.
The solution:
You will set the the artifact type in the section called 'packaging'. This XML element normally exists directly under the root 'project' XML element in your pom. For most maven projects this value will be either jar or war. What you put here will affect what gets created when you type 'mvn package'. There are other plugins that will allow you to use other types of packaging. One is the 'maven-plugin' packaging type, which is used in the project pom for a maven plugin.
You can find more about plugins (and their packaging) here.
Install a Project Artifact
The problem:
Your project creates a war or jar that you would like to have in your local repository so that another project can include it as a dependency.
The solution:
The maven install command will get the job done. You can run this by typing 'mvn install'. When you do this your project gets built and packaged like normal, and then the jar, war, or whatever artifact your project builds gets put into your local repository. Once in your local repository your artifact becomes available to other projects being built on your machine. To get the artifact in other projects include it's information in a 'dependency' element in your pom.
Pom Inheritance
The problem:
You have a pom that contains configuration which you could reuse in another pom.
The solution:
You can inherit the configuration of a parent pom for use as the base of a new pom. This technique has many useful applications. One very important use is keeping configuration in one place. If you have a multitude of projects that inherit from one pom, then they will share some configuration. You can now change the configuration in the parent pom and all projects inheriting will get the changes. Think how much easier that makes changing a property that is inherited by 10, 15, maybe more projects.
So you are wondering how can I do such a great thing? It's easy just insert the parents pom's artifact id, group id, and version in your pom. You will put this information in the parent section of your pom. Here is what it will look like:
<parent>Thats all there is too it. Once you put that into your pom you inherit that pom's configuration. One last thing the parent pom must be in a reachable repository location.
<artifactId>Parent pom artifact id</artifactId>
<groupId>Parent pom group id</groupId>
<version>Parent pom's version</version>
</parent>
Sunday, June 10, 2007
Integration Testing in your Maven Application
The problem:
You want to create integration tests in your Maven project. You don't want these tests to run every time you compile.
The solution:
Create some profiles in your pom.xml. You can create a profile that by default excludes running any test that starts or ends with the words 'IntegrationTest'. You can then include a profile that will run these tests when activated.
Here is an example you can use in your pom:
If you use this configuration, by default a test called "LegacySystemIntegrationTest" would not get run by surefire when you compile. If you issue the command
<!-- Use this profile to allow integration tests to run -->
<profiles>
    <profile>
        <id>no_integration_testing</id>
      <activation>
        <activeByDefault>true</activeByDefault>
      </activation>
        <build>
            <plugins>
                <plugin>
                    <artifactId>maven-surefire-plugin</artifactId>
                    <configuration>
                        <excludes>
                            <exclude>**/*IntegrationTest.java</exclude>
                            <exclude>**/IntegrationTest*.java</exclude>
                        </excludes>
                    </configuration>
                </plugin>
            </plugins>
        </build>
    </profile>
    <profile>
        <id>integration_testing</id>
        <build>
            <plugins>
                <plugin>
                    <artifactId>maven-surefire-plugin</artifactId>
                    <configuration>
                        <includes>
                            <include>**/*IntegrationTest.java</include>
                            <include>**/IntegrationTest*.java</include>
                        </includes>
                        <excludes>
                        </excludes>
                    </configuration>
                </plugin>
            </plugins>
        </build>
    </profile>
</profiles>
"mvn -P integration_testing compile"then this integration test (and any others named in this fashion) will get run. Note there are some gotchas when using this strategy:
- If you include the profiles above in a pom that gets inherited, the pom which inherits may override the default excludes. If the sub-pom does override excludes the entries from the profile go away and tests with "IntegrationTest" in them will get run by Surefire.
- Any integration tests that do not start or end with "IntegrationTest" will get run. You are expected to follow a convention here. You could add more excludes and incluedes to my example above in this case though.
Tuesday, June 5, 2007
Getting Groovy with Maven
The problem:
You would like to integrate Groovy scripts into your Maven application.
The solution:
Maven has a plug-in for groovy! You should put your scripts into "src/main/groovy", and test scripts into "src/test/groovy". To make groovy compile add this plug-in definition to your pom:
and then this dependency:
Thats all there is to it! Now go script up a storm.
You would like to integrate Groovy scripts into your Maven application.
The solution:
Maven has a plug-in for groovy! You should put your scripts into "src/main/groovy", and test scripts into "src/test/groovy". To make groovy compile add this plug-in definition to your pom:
 <build>
   ...
   <plugins>
     <plugin>
       <groupId>org.codehaus.mojo</groupId>
       <artifactId>groovy-maven-plugin</artifactId>
       <executions>
         <execution>
           <goals>
             <goal>compile</goal>
           </goals>
         </execution>
       </executions>
     </plugin>
   </plugins>
   ...
 </build>
and then this dependency:
<dependency>
 <groupId>groovy</groupId>
 <artifactId>groovy-all</artifactId>
 <version>1.0-jsr-04</version>
</dependency>
Thats all there is to it! Now go script up a storm.
Monday, June 4, 2007
Output Your Effective Pom to disk
The problem:
You would like to have a copy of the effective pom file used in your project. The effective pom is your current projects pom merged with any inherited poms.
The solution:
If you have read the post "Seeing the Big Picture with Inherited Poms" you know that by type "mvn help:effective-pom" a copy of the effective pom will be outputted to your screen. This is nice but what if you want a copy of this on file? Maybe you would like to attach it to an email, or use it to cut and paste together a new file. Well Maven has this one covered. Use the following command
is the name of the file you would like the effective pom written to.
You would like to have a copy of the effective pom file used in your project. The effective pom is your current projects pom merged with any inherited poms.
The solution:
If you have read the post "Seeing the Big Picture with Inherited Poms" you know that by type "mvn help:effective-pom" a copy of the effective pom will be outputted to your screen. This is nice but what if you want a copy of this on file? Maybe you would like to attach it to an email, or use it to cut and paste together a new file. Well Maven has this one covered. Use the following command
mvn -Doutput=Where <filename><filename> help:effective-pom
Profiles in Maven
The problem:
You would like to set up Maven to run in one or more configurations that you have defined.
The solution:
Maven has a profile mechanism that naturally fits this type of thing. You can create any number of profiles that each contain settings that can override other Maven settings. Here is an example of some profiles:
Name this profiles.xml and put it into your projects folder next to the pom.xml. You may have noticed the activation elements in the file. These are what trigger the profile to be active. You can trigger these by defining a system property with the value given in the activation value element. So you use Java 6 compilation you would do "mvn -Djdk=6 ..." where ... is the Maven commands to execute.
Note that more than one profile can be active at once. Since profiles can contain the same types of configuration there can be clashes. If two profiles clash the last to be activated will override those activated earlier.
You would like to set up Maven to run in one or more configurations that you have defined.
The solution:
Maven has a profile mechanism that naturally fits this type of thing. You can create any number of profiles that each contain settings that can override other Maven settings. Here is an example of some profiles:
<profiles>
    <!-- profile for java 5 -->
    <profile>
        <id>java5</id>
        <activation>
            <property>
                <name>jdk</name>
                <value>5</value>
            </property>
        </activation>
        <build>
            <plugins>
              <plugin>
                <groupId>org.apache.maven.plugins</groupId>
                <artifactId>maven-compiler-plugin</artifactId>
                <configuration>
                  <source>1.5</source>
                  <target>1.5</target>
                </configuration>
              </plugin>
            </plugins>
        </build>
    </profile>
    <!-- profile for java 6 -->
    <profile>
        <id>java6</id>
        <activation>
            <property>
                <name>jdk</name>
                <value>6</value>
            </property>
        </activation>
        <build>
            <plugins>
              <plugin>
                <groupId>org.apache.maven.plugins</groupId>
                <artifactId>maven-compiler-plugin</artifactId>
                <configuration>
                  <source>1.6</source>
                  <target>1.6</target>
                </configuration>
              </plugin>
            </plugins>
        </build>
    </profile>
</profiles>
Name this profiles.xml and put it into your projects folder next to the pom.xml. You may have noticed the activation elements in the file. These are what trigger the profile to be active. You can trigger these by defining a system property with the value given in the activation value element. So you use Java 6 compilation you would do "mvn -Djdk=6 ..." where ... is the Maven commands to execute.
Note that more than one profile can be active at once. Since profiles can contain the same types of configuration there can be clashes. If two profiles clash the last to be activated will override those activated earlier.
Saturday, June 2, 2007
Seeing the Big Picture with Inherited Poms
The problem:
You have a child pom that inherits from a parent pom, which may inherit from another and then some. You are not sure exactly what all is going on in the child pom.
The solution:
When you use inheritance in a pom it makes life easier. You don't need to know about all the stuff that was defined in the higher level POM, it just works. Then there are times when you get into some fancy Maven configuration and you really need to troubleshoot a problem that could be inheritance related. This one is dirt simple:
By typing this on the command line you can get the full configuration that is being used in your project. This is done by merging all the parent configuration with your projects configuration, and then displaying it in the terminal.
You have a child pom that inherits from a parent pom, which may inherit from another and then some. You are not sure exactly what all is going on in the child pom.
The solution:
When you use inheritance in a pom it makes life easier. You don't need to know about all the stuff that was defined in the higher level POM, it just works. Then there are times when you get into some fancy Maven configuration and you really need to troubleshoot a problem that could be inheritance related. This one is dirt simple:
mvn help:effective-pom
By typing this on the command line you can get the full configuration that is being used in your project. This is done by merging all the parent configuration with your projects configuration, and then displaying it in the terminal.
Per user server authentication
The problem:
Each user has their own username and password for network machines that are accessed by Maven when deploying artifacts, websites, or maybe some other files. You wouldn't want this type of information in your project pom.xml so what do you do?
The solution:
The settings.xml file in your {HOME_DIR}/.m2* folder is your ticket. You can define servers and for each one define your username and password. Note that each server entry must have an id that matches with the one defined in the distribution management or other part of your pom.xml. Here is the example:
* This is /Users/{username} on Macs, Documents and Settings/{username} on Windows or /home/{username} on most linux machines.
Each user has their own username and password for network machines that are accessed by Maven when deploying artifacts, websites, or maybe some other files. You wouldn't want this type of information in your project pom.xml so what do you do?
The solution:
The settings.xml file in your {HOME_DIR}/.m2* folder is your ticket. You can define servers and for each one define your username and password. Note that each server entry must have an id that matches with the one defined in the distribution management or other part of your pom.xml. Here is the example:
<settings>You should fill in the username, password and path to keys. On my Mac the path to ssh keys is /Users/ottaway/.ssh/known_hosts. You will need to do a little investigation on this if using a Windows machine. Please let me know if you figure it out.
<servers>
<server>
<id>hood</id>
<username>ottaway</username>
<password>Cm0nkeyz</password>
<privateKey>/Users/ottaway/.ssh/known_hosts</privateKey>
</server>
</servers>
</settings>
* This is /Users/{username} on Macs, Documents and Settings/{username} on Windows or /home/{username} on most linux machines.
Concepts of Maven pt. 1
Project structure...
You should never have to change the basic Maven project structure. Believe me, I have worked with Spring 1.x/2.x, Hibernate 2.x/3.x, DWR, Struts, Web MVC (Spring), Portlets, XFire web services, etc. etc. Pretty much any J2EE or Java technology out there I have used in one of my Maven projects.
Why am I stating the above? Because the #1 thing I hear about Maven, and why some person does not use it, is that Java framework X does not work with Maven. This is erroneous. I wish people could be more honest and just state "Hey I don't know". Instead they attack the unknown. Lame. Linking back to structure, often I hear these complaints and other offer solutions that include overriding the default Maven project structure.
If you override the defaults you are destroying the simplicity of the Maven project. By setting up defaults for things in Maven, it provides users the security that they can open any Maven project and quickly understand exactly it's structure. I know that files in src/main/resources will be loaded right into the top of the class path hierarchy once compiled. So any Spring, Hibernate, logging, or other configuration files will be found here. Likewise src/test/resources will be where testing resources go, such as testing Hibernate configuration, testing logging configuration and so on. I know that when creating a web application the basic J2EE web application structure will be contained in the project, and found at src/main/webapp. So WEB-INF will be at src/main/webapp/WEB-INF. I know, enough already. I'm beating a dead horse, you all got the point... Ok just wanted to emphasize why you don't change the structure.
If you have a framework you want to work with in Maven, and can't figure it out after reading this blog and other resources out there then email me, or post a comment to this blog. Please I beg of you, Maven does not deserve a bad rap!!!
Learn it...
Maven is not so simple to just sit down and start using. I say this in direct comparison to Ant, or make. Ant is really easy to get going for a project with very little work. I would say Maven is too, but only for simple compiling and packaging. Get into testing and know things get a little tougher. There are a lot of options, a lot of plug-ins. I recommend two things.
Please understand a few things...
Maven is a system. That means it is a bit complex. But... know this. You should have a super experienced maven pro at your place, who can do ALL the heavy lifting so that developers can very quickly develop. It's the same paradigm as a sys-admin setting up all the test environments so that the developer can come in and do their job.
In Maven there are a few things involved in the "sys-admin" type work.
You should never have to change the basic Maven project structure. Believe me, I have worked with Spring 1.x/2.x, Hibernate 2.x/3.x, DWR, Struts, Web MVC (Spring), Portlets, XFire web services, etc. etc. Pretty much any J2EE or Java technology out there I have used in one of my Maven projects.
Why am I stating the above? Because the #1 thing I hear about Maven, and why some person does not use it, is that Java framework X does not work with Maven. This is erroneous. I wish people could be more honest and just state "Hey I don't know". Instead they attack the unknown. Lame. Linking back to structure, often I hear these complaints and other offer solutions that include overriding the default Maven project structure.
If you override the defaults you are destroying the simplicity of the Maven project. By setting up defaults for things in Maven, it provides users the security that they can open any Maven project and quickly understand exactly it's structure. I know that files in src/main/resources will be loaded right into the top of the class path hierarchy once compiled. So any Spring, Hibernate, logging, or other configuration files will be found here. Likewise src/test/resources will be where testing resources go, such as testing Hibernate configuration, testing logging configuration and so on. I know that when creating a web application the basic J2EE web application structure will be contained in the project, and found at src/main/webapp. So WEB-INF will be at src/main/webapp/WEB-INF. I know, enough already. I'm beating a dead horse, you all got the point... Ok just wanted to emphasize why you don't change the structure.
If you have a framework you want to work with in Maven, and can't figure it out after reading this blog and other resources out there then email me, or post a comment to this blog. Please I beg of you, Maven does not deserve a bad rap!!!
Learn it...
Maven is not so simple to just sit down and start using. I say this in direct comparison to Ant, or make. Ant is really easy to get going for a project with very little work. I would say Maven is too, but only for simple compiling and packaging. Get into testing and know things get a little tougher. There are a lot of options, a lot of plug-ins. I recommend two things.
- First read this article off of the Maven site. It wasn't always there, and the first time I read it a lot of things clicked in my head. It may not really make full sense until you use Maven for a bit. It talks of the build life cycle, which is the backbone of Maven.
- Get the free book "Better Builds with Maven". A company called Mergere put this out. It is really good. Here is a link, if it is dead use google!
Please understand a few things...
Maven is a system. That means it is a bit complex. But... know this. You should have a super experienced maven pro at your place, who can do ALL the heavy lifting so that developers can very quickly develop. It's the same paradigm as a sys-admin setting up all the test environments so that the developer can come in and do their job.
In Maven there are a few things involved in the "sys-admin" type work.
- First and foremost is setting up the network repositories being used by developers. This may simply be a single location on a machine, but could be multiple locations on multiple machines. It really depends on your companies circumstances. You may also want to set up a proxying software for one or more repos. This makes it so that developers only need access your local network repo(s), which can go to repos outside the network, get a dependency and cache it local. This has benefits in speeding up download time for dependencies. I highly recommend you do this if you are serious about Maven.
- POM inheritance model. This is maybe the most powerful feature of Maven. You can specify a lot of things in a POM, Java compiler version, website location, reports to generate (JUnit health, PMD, JIRA..), how to configure Jetty to run your web application (yes type mvn jetty:run and bam you have your app running!!!). These and more can be specified in a POM, and that POM can then be added as parent to another POM. The child POM then inherits all the configuration from the parent, overriding where collisions occur. As the "sys-admin" of Maven you can configure many things so that users will never have to worry about them. Look for examples of this here, in my blog.
- Archetypes are great. They really are pretty easy to develop once you get the hang. The problem is that there are not a lot of great archetypes available and documented. This will change eventually. To give you the idea of an archetype think of a template but more complex. An archetype allows you to generate a project using a simple 'mvn' command. This could create a XFire, Hibernate, JMS or some other type of project. By the "sys-admin" making available and documenting archetypes projects can get done quicker
. I have personally created and used them for XFire SOAP services and Hibernate 3.x ORM projects, and you can crank them out using archetypes. If you have used Ruby on Rails think of these as generators. You can create any number of them yourself and put them in the network repo where other developers can use them.
Maven 2 + Hibernate + HSQLDB (project contained integration testing for Hibernate)
The problem:
You must check your Hibernate objects against a database for testing purposes. This database is somewhere on your network, and accessible to many of your fellow co-workers. You cannot expect anything to stay static in this db, which means eventually your tests will fail.
A solution:
Maven can make projects very portable. Hibernate makes working with persistent objects simple. HSQLDB is a Java database that you can run embeded in other programs.
A problem with using Hibernate is it can take away some of the portability of your project. This happens because you must provide a database for making your objects persistent. In doing so your test configuration files will be spec'd to a single database. What happens when someone runs the project's tests and does not have access to the test database? The tests will fail :( We want to have unit tests be used for all our hibernate objects. It is especially important to thoroughly test them, as they will be a central part of your projects functioning properly (especially web projects!).
Luckily Maven makes it easy to use one database for testing, and another for production. This is where HSQLDB can come in handy. You can create a hibernate config just for testing which connects to an in memory HSQL database. You will need the proper files in src/test/resources folder of your Maven 2 project. The files include the test version of your hibernate config file. I put the hibernate mapping files into folders that mirror the packaging of the POJO object classes. When you run '
So you can see that there are a hibernate configuration file for the build and the test phase. Now in the test hibernate.cfg.xml file you will need to have the following properties set:
These entries should have you now set up to use a in memory database for all your testing with hibernate. But before this will work you need to do one more thing.
Set up you Maven 2 project so that HSQLDB is a dependency. Added this dependency section to your project:
Note that you will not need to make any specific JDBC driver available. The HSQLDB dependency contains the proper driver!
Using this recipe you will be able to make very portable Maven/Hibernate projects. Users any place in the world will be able to check out your project and test it immediately. If they would like to test using their own database it is not hard for them to overwrite what is in the src/test/hibernate.cfg.xml file.
You must check your Hibernate objects against a database for testing purposes. This database is somewhere on your network, and accessible to many of your fellow co-workers. You cannot expect anything to stay static in this db, which means eventually your tests will fail.
A solution:
Maven can make projects very portable. Hibernate makes working with persistent objects simple. HSQLDB is a Java database that you can run embeded in other programs.
A problem with using Hibernate is it can take away some of the portability of your project. This happens because you must provide a database for making your objects persistent. In doing so your test configuration files will be spec'd to a single database. What happens when someone runs the project's tests and does not have access to the test database? The tests will fail :( We want to have unit tests be used for all our hibernate objects. It is especially important to thoroughly test them, as they will be a central part of your projects functioning properly (especially web projects!).
Luckily Maven makes it easy to use one database for testing, and another for production. This is where HSQLDB can come in handy. You can create a hibernate config just for testing which connects to an in memory HSQL database. You will need the proper files in src/test/resources folder of your Maven 2 project. The files include the test version of your hibernate config file. I put the hibernate mapping files into folders that mirror the packaging of the POJO object classes. When you run '
mvn package' the .hbm files will be placed in the same folder as the POJO class they belong to. Here is an example of my Maven 2 project's structure:/project
pom.xml
...other files
/src
/main
/java
/some
/package
Foo.java
/resources
hibernate.cfg.xml
/some
/package
Foo.hbm.xml
/test
/java
/some
/testpackage
TestFoo.java
/resources
hibernate.cfg.xm
So you can see that there are a hibernate configuration file for the build and the test phase. Now in the test hibernate.cfg.xml file you will need to have the following properties set:
<!-- Database connection settings -->
<!-- HSQL DB -->
<property name="connection.driver_class">org.hsqldb.jdbcDriver</property>
<property name="connection.url">jdbc:hsqldb:mem:aname</property>
<property name="connection.username">sa</property>
<property name="connection.password"></property>

and...

<property name="dialect">org.hibernate.dialect.HSQLDialect</property>
<mapping resource="some/package/Foo.hbm.xml" />
These entries should have you now set up to use a in memory database for all your testing with hibernate. But before this will work you need to do one more thing.
Set up you Maven 2 project so that HSQLDB is a dependency. Added this dependency section to your project:
<dependency>
  <groupId>hsqldb</groupId>
  <artifactId>hsqldb</artifactId>
  <version>1.8.0.1</version>
</dependency>
Note that you will not need to make any specific JDBC driver available. The HSQLDB dependency contains the proper driver!
Using this recipe you will be able to make very portable Maven/Hibernate projects. Users any place in the world will be able to check out your project and test it immediately. If they would like to test using their own database it is not hard for them to overwrite what is in the src/test/hibernate.cfg.xml file.
About this blog
I have been blogging for about a year or so. I sometimes put entries about programming into my blog. One or more have been about Maven. I use Maven a lot at work with Java projects I work on. I felt I should create a blog to hold all the nice little cookbook style recipes I have whipped up using Maven. Enjoy!!!
Subscribe to:
Posts (Atom)